

Method 1: Disable Windows 11 Update Service
One way to stop Windows 11 automatic updates over any type of internet connection is by disabling the Windows Update service. To do that, follow the steps below:
Open the “Run” dialog box (use Windows key + R shortcut), type services.msc in the text field, and hit Enter.

On the Services window, scroll down to the bottom and double-click on “Windows Update“. This will open the Windows Update properties window.

On the properties window, open the “General” tab if you are not there already there. Now, select “Disabled” from the drop-down menu next to “Startup type” and click on “OK” or “Apply” to save the update settings.

That’s it. Your Windows 11 device will no longer update automatically. And if you ever want to re-enable automatic updates on your Windows 11 PC, retrace your path and select “Automatic” from the “Startup type” drop-down menu.
Method 2: Disable Windows 11 Automatic Updates Using Group Policy
Note: Group Policy Editor is not officially available in Windows 11 Home. However, you can still enable Group Policy Editor on Windows 11 Home by following this guide. The method described in the linked article was originally devised for Windows 10, but it works perfectly well in Windows 11.
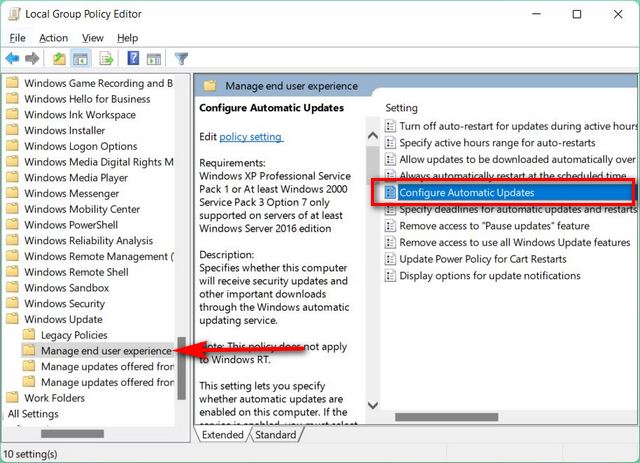
First, open the Local Group Policy Editor on your computer. To do that, open the “Run” dialog box (Windows key + R shortcut). Now type in gpedit.msc and hit Enter to open the Group Policy Editor.

Next, in the right pane, double-click on the entry that says “Configure Windows Updates“.
On the automatic updates configuration page, select “Disabled” and click on “OK” or “Apply” to save your preference. That should now turn off automatic updates on your Windows 11 PC.

Note: When the status for this policy is set to “Disabled”, any available updates must be downloaded and installed manually.
Disable Auto-Updates on Your Windows 11 Computer
Automatic updates are a massive pain for Windows users. That’s not only because the update consumes huge amounts of data on connections not meant for excessive data consumption,
but also because it takes away choice from users. Hopefully, our detailed guide here helped you disable or stop automatic updates on your Windows 11 computer for good. Once you are done tackling auto-updates, check out some of our other Windows 11 tutorials. You can learn how to switch back to a Windows 10-style Start Menu design on your Win 11 installation and how to change the default browser in Windows 11.


0 Comments
Thanks for Your Comment